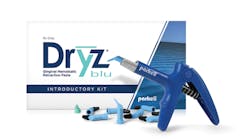
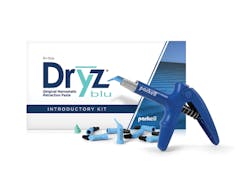
Dryz Blu gingival hemostatic retraction paste from Parkell
For most of my dental career, I used the two-cord technique during my indirect restorative procedures. I used a smaller cord (size 0 or 00) to push the tissue apically before refining my margins. Then I placed a larger cord (size 1 or 2) to push the sulcus laterally in order to record the margins accurately with impression material or my intraoral scanner.
My biggest beef with this technique was having to pull the second cord right before taking the impression. About half of the time, this would trigger a little bleeding that I would have to deal with at the most inopportune time—right before the impression or scan! Hemostatic retraction paste helped me change that whole workflow.
Instead of the second cord and the pulling and the dealing with possible bleeding, I just use the retraction paste. The paste expands while it is in the mouth, providing that lateral retraction. It is also hemostatic and can stop almost any sulcular bleeding, no matter how intense.
One issue with a lot of these retraction pastes is that they are somewhat difficult to rinse away. It takes effort to get them rinsed, and it is not uncommon to discover that some has been missed and needs to be rerinsed. Dryz Blu retraction paste by Parkell helps address that.
Dryz Blu comes in a unit-dose compule, just like composite, which helps with infection control. As the name indicates, it has blue coloring, so you can immediately see if all of it has been rinsed away. It is also designed to rinse away more easily. It’s a two-pronged approach to fixing a common frustration with hemostatic retraction paste. In addition to being more visible and easier to rinse away, Dryz Blu is also stiffer than the original Dryz. This extra stiffness allows you to get it into the sulcus more easily and gives it more sulcular expansion.
Using Dryz Blu is pretty simple. For preps with supragingival margins, paste is all I use. For subgingival margins, I still pack a small cord and then add Dryz Blu after prep refinement. Squirt the Dryz Blu around the margins, guiding it into the sulcus. Have the patient bite on a Comprecap (Coltene/Whaledent) or a cotton roll. Let it sit for two minutes at the very least. I let it sit for up to eight minutes if possible. The longer, the better. Rinse it away, and get ready to take an awesome impression or scan! It is that simple. Dryz Blu saves me time and frustration.
Dryz Blu is also one of the more economic hemostatic retraction pastes. Running around $4 per application, it’s cheaper than many of the other options on the market. Dryz Blu cuts a step out of my crown-prep procedure. It is simple and easy to use and helps me get great scans. Hard-hit single over the shortstop for Parkell!
Palodent Plus WedgeGuard from Dentsply Sirona
I can remember a moment in dental school during sophomore Operative Dentistry when I thought prepping a Class II restoration was impossible. I could not fathom prepping an interproximal box without damaging the adjacent tooth. I had to spend some time with my dental school’s “prep whisperer,” Tom Marshall, DDS. Dr. Marshall was a gem of a human being. He was one of our oldest faculty members and a wise mentor for many. He was the one dental students would go to when they needed a little extra help learning how to prep. He was very tall—probably six feet seven—and had huge hands. He had a slight tremor, and you’d wonder how on earth he would be able to teach you anything about prepping with that little shake. Then he would pick up the handpiece, and his hands would move as smoothly as silk. We spent a few sessions working on Class II preps, and with that extra time, I really learned how to prep.
During our tutoring sessions, Dr. Marshall would extol the virtues of not causing iatrogenic damage. He was so right, yet I routinely see new patients who have iatrogenic damage on interproximal surfaces from preps on neighboring teeth. These patients already have increased caries risk (otherwise, why would anyone do a prep on them?), so that damaged enamel is a recipe for another lesion. Up to 60% of teeth adjacent to Class II restorations have some amount of iatrogenic damage.1 We should be doing more to protect these teeth.
There are plenty of products that can help with this. Most of these products are simply some matrix-band type of material attached to a wedge that is trashed after use. While these work pretty well, they don’t fit my systems. I’m obsessed with efficiency and cutting down on disposable costs. I want a product that doesn’t drive up my costs and increase my waste. Palodent Plus WedgeGuard by Dentsply Sirona is a much better choice for me.
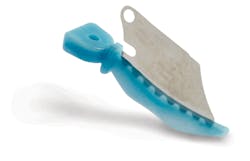
The original Palodent Plus wedges are anatomical and seal around the matrices very well. They are hollow on the underside, so you can place an additional wedge from the other direction if needed. These wedges were already amazing, and Dentsply Sirona has made them better by adding a removable WedgeGuard to prevent iatrogenic damage.
These are easy to use: Prewedge the area with a Palodent Plus WedgeGuard. Prep the tooth. There is a small hole in the corner of the metal portion of the WedgeGuard. Put an explorer through that hole and pull. The metal part of the WedgeGuard will disengage, leaving you with a Palodent Plus wedge to use with a matrix and ring to complete the restoration. Brilliant! This minimizes waste, saves you money, and saves teeth from iatrogenic damage. That is something both Dr. Tom Marshall and I can get behind. Triple to the power alley for Dentsply Sirona on Palodent Plus WedgeGuard!
Reference
1. Medeiros VA, Seddon RP. Iatrogenic damage to approximal surfaces in contact with Class II restorations. J Dent. 2000;28(2):103-110.
XOcademy at exocademy.net
I like to fancy myself a digital dentist. It’s a cool thing to say at meetings and cocktail parties. It conveys something, a sense of advancement. I am not bound by the petty restrictions of impression material. I have the power of digital technology.
But there is one problem with that hokum: I am not a real digital dentist. I take digital impressions. I send those digital files to the lab, the same way I would send a polyvinyl siloxane impression to the lab. That doesn’t make me a digital dentist. In order to become a digital dentist, I need to use the digital data that I capture in my scans in other workflows in my office.
The problem with that is software. Software is the missing link that can allow dentists who capture scan data to use that data in new and novel ways. Exocad is a great choice for this. Exocad is one of the two most popular dental design software suites on the market. There is a good chance that the dental lab you work with uses it to design your restorations, but it is not restricted to lab usage.
You can buy Exocad and use it in your practice for a lot of different workflows. You can’t buy it directly from Exocad, though. You need a reseller. That is where XOcademy (exocademy.net) comes in. Having Exocad in your office will allow you to take the leap to becoming a digital dentist. Whether you add a milling unit or a 3-D printer, Exocad will let you turn your captured data into restorations, prosthetics, and appliances fabricated in your office.
XOcademy is more than just a reseller of Exocad software. XOcademy is an all-out training and education center that will help you get the most out of your investment in Exocad. XOcademy offers tons of videos that walk you through some ways to up your digital game, including everything from using Exocad to building 3-D printable models to millable and printable denture setups. The library of educational videos will teach you how to take advantage of all of the phases of your Exocad software.
XOcademy can help you transition to digital dentistry, all while showing you how to get the most out of your investment. From the comfort of your home or office, it will give you something to brag about at the next meeting or cocktail party you attend. Double down the third-base line for XOcademy!


