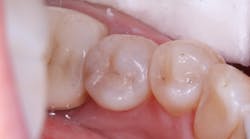
Speed, efficiency, and beauty: Direct composite restorations
PLACING DIRECT COMPOSITE RESTORATIONS—especially in the posterior—requires speed, efficiency, and a beautiful end product. There are a great variety of tools, materials, and techniques to achieve this. The process includes isolation, cavity preparation, and restorative placement. Isolating the operative site offers the ability to work in a dry field, free of contaminants, which is an especially important issue when using direct composite. Devices, such as the DryShield, that maintain open occlusion with a combination suction and cheek/tongue retractor are useful for achieving rapid isolation.
Cavity preparation, especially when removing existing amalgam restorations, can be greatly aided when using carbide burs. It is especially important to minimize the potential for enamel microstress fractures, often propagated through the use of large-bladed carbide burs. This can be greatly mitigated when using small-bladed carbide burs, such as those found in the SS White series of microprep burs and known as the Fissurotomy bur. Penetrating the amalgam and then making a circumferential channel along the amalgam margin can make for swift removal, allowing the remaining chunk to be dislodged.
Finally, when selecting a composite resin, it is ideal to have both a strong and beautiful material. However, the problem of shade selection, even in the posterior, has always been a challenge. The benefits of a one-composite system offer a streamlined restorative process, simplified inventory management, reduction of unused composite waste, and the ability never to be short-stocked on a shade.
One recent composite utilizes structural color as the basis for its primary feature. Known as Omnichroma (Tokuyama Dental America), its fillers generate red to yellow color as ambient light passes through. Because all human teeth already possess the colors generated by this composite, its color combines with the reflected color of the surrounding tooth, creating a shade match for any patient. Thus, there are now two methods by which composite resins generate their color:
1. Chemical color (traditional composite resins)—The composite resin contains colored pigments and, therefore, the color of the composite resin is determined by the chemical composition of the pigments.
2. Structural color (Omnichroma composite resin)—Here, the perceived color is generated by the interaction of light with the microscopic structure of the material. With objects that exhibit structural colors, light enters the surface of the object and different wavelengths are amplified or weakened through the microscopic structures of the object. The shape and exact size of these structures affect the wavelength of the light as it exits the material, exhibiting different colors.
In addition, because this composite changes shade along with the tooth, the shade matches both before and after bleaching. It is, in essence, a one-shade universal composite; i.e., no shade choices are required. Omnichroma Blocker (Tokuyama Dental America), an optional base or lingual layer, can be used in cases where an opaquer is required, e.g., on particularly large anterior restorations and to mask staining.
The following two cases demonstrate the use of the various concepts and devices mentioned here.
Case No. 1
The first case demonstrates a molar with the often-typical A1/B1 shade. It required an occlusal restoration. Following local anesthesia, a DryShield isolation device was placed intraorally. The cavity was accessed and cleaned (figure 1). After rinsing and gentle drying of the dentin, Tokuyama Universal Bond (Tokuyama Dental America), an eighth-generation bonding agent, was applied and dried, without the need for light curing. The Omnichroma composite was built up and cured in 2 mm increments until the tooth was fully restored (figure 2). Note that prior to curing, Omnichroma will appear opaque white. Then, following curing, it immediately blends into the surrounding tooth structure. The occlusion was adjusted, and the composite and surrounding enamel was polished.
Case No. 2
Most posterior teeth are a Vita shade A1/B1, an easy color to blend using many composites. The real test of a universal-shaded composite is its behavior in a darkly shaded posterior tooth. A lower bicuspid (tooth No. 20) with Vita shade C2 required removal of a defective amalgam restoration (figure 3). The site was not anesthetized; it was isolated using a DryShield, and the amalgam removed as a chunk using the Fissurotomy bur (figure 4).
As in the prior case, the dentin was rinsed and gently dried. Once again, an eighth-generation bonding agent, Tokuyama Universal Bond, was applied and dried, without the need for light curing. The Omnichroma composite was then used to restore the cavity preparation, building the Class I in 2 mm increments, and it was cured until the tooth was fully restored. Before it is cured, Omnichroma will appear opaque white (figure 5). However, once cured, it immediately blends into the surrounding tooth structure. This chameleon-like ability of Omnichroma to “melt” into the surrounding enamel is its hallmark. The occlusion was then adjusted, and the composite and surrounding enamel was polished (figure 6).


