Figure2 6184375dac8f1

Digital implant planning with prefabricated immediate provisional: A digital workflow example

Nov. 15, 2021
Dr. Matthew Wimmer discusses digital treatment planning for a fully guided anterior implant along with a completely prefabricated provisional restoration that will not need to be picked up in the mouth, saving chair time.
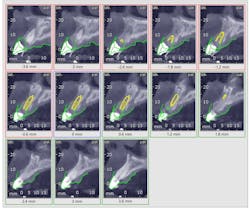
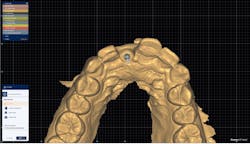
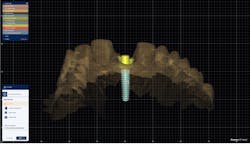
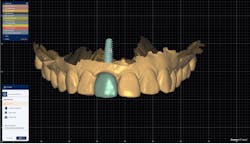
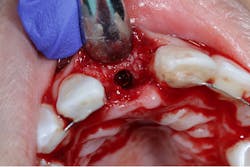
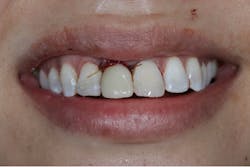
Digital CAD/CAM technology has allowed the dentist and laboratory technician to simplify the implant planning and immediate load process, allowing faster and more predictable immediate load treatments. In this article, I will discuss the digital treatment planning for a fully guided anterior implant along with a completely prefabricated provisional restoration that will not need to be picked up in the mouth, which will save valuable chair time (figures 1–6).With any treatment plan, accurate record-taking is of utmost importance. With

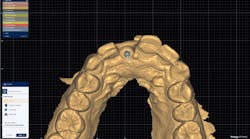
this workflow example, we need a CBCT and intraoral scans to begin. The CBCT (Carestream 9600) DICOM files and intraoral scans (Carestream 3600) are exported in STL format. These files are then imported into Exoplan implant planning software (Exocad). The CBCT DICOM files are opened, and the threshold Hounsfield units are set to separate soft tissue, bone, and teeth.The next step is to define the panoramic curve. Exoplan is a prosthetically driven implant planning software. For ease of prosthetic planning/visualization, the

intraoral scan is then merged with the CBCT DICOM files. When an accurate alignment is achieved, a digital wax-up tooth can be placed in an ideal position. From this wax-up position and a CBCT overlay, an implant of proper size can be virtually placed in the correct position.In this case, an MIS C1 (Dentsply Sirona) 3.3 x 11.5 narrow platform implant was placed with the screw access directed through the cingulum of the wax-up tooth. After confirming the implant was adequately placed virtually in all planning views, the correct guided surgical kit was selected. The software placed the virtual surgical guide tube in the correct location. The software prompts were then followed to design a surgical guide, which were manufactured by 3D printing on my NextDent 5100 printer (3D Systems) from
surgical guide resin. In this step, it is important to select the option to engrave the implant hex markings on the surgical guide.

Read related content:

How digital treatment planning can increase case acceptance
Building a "futureproof" digital workflow

This digital implant plan project file was saved and imported into my copy of Ceramill Mind (Amann Girrbach) and Exocad-based dental CAD software. Because Exoplan is Exocad-based, it allows complete control of the restoration design on the exported implant plan. The project file was opened, and the intraoral scans, wax-up, and virtual implant position were imported automatically. An emergence profile was then digitally sculpted into the implant site using the edit jaw scan tools.

Next, the wizard steps were completed for a screw-retained restoration. After selecting the proper height titanium base, the software then merged the crown wax-up with the titanium base that had been selected. The occlusion and contact were adjusted, and the screw channel was subtracted from the crown. After the implant crown is finalized and merged into a new STL file, the final crown can be manufactured by the method of your choosing. In this case, it was 3D printed out of NextDent C&B MFH composite material on the NextDent 5100 printer. The printed crown was postprocessed according to the manufacturer’s instructions and then bonded to a titanium base using multilink hybrid abutment cement (Ivoclar Vivadent). The crown was then characterized using Optiglaze stains (GC America) and polished.

At surgery the implant was placed fully guided, and the clocking of the hex was aligned with the engraved hex markers on the surgical guide to ensure proper seating of the provisional crown titanium base complex. After implant placement was completed, the crown was seated, and the abutment screw hand-torqued. The screw access was sealed with Teflon tape and composite, and the occlusion was adjusted to ensure no contacts were on the crown. Sutures were
placed and the patient was allowed to heal for four months to allow the implant to integrate and the tissue to heal.

The benefit of this workflow is reduced chair time and an accurately fitting provisional restoration that is completely premade to sculpt the emergence profile during the healing process. Possible issues that could happen include an improperly aligned implant connection that would prevent correct seating of the crown or poor primary stability of the implant. The latter can be overcome by carefully adjusting the orientation of the implant connection to correct the alignment of the provisional. These potential problems can easily be avoided by adhering to a careful surgical protocol and being mindful of the bone quality while preforming the osteotomy.  

Editor's note: This article appeared in the November 2021 print edition of Dental Economics.
Matthew R. Wimmer, DMD, attended Tufts University School of Dental Medicine and has an undergraduate degree in biomedical engineering. He makes the most out of technology in his practice and has incorporated CBCT, intraoral scanning, all-tissue lasers, and various CAD/CAM and 3D printing technologies. He is a key opinion leader for Carestream Dental and Convergent Dental. Dr. Wimmer maintains a private practice in Centennial, Colorado.

About the Author

Matthew R. Wimmer, DMD

Matthew R. Wimmer, DMD, attended Tufts University School of Dental Medicine and has an undergraduate degree in biomedical engineering. He makes the most out of technology in his practice and has incorporated CBCT, intraoral scanning, all-tissue lasers, and various CAD/CAM and 3D printing technologies. He is a key opinion leader for Carestream Dental and Convergent Dental. Dr. Wimmer maintains a private practice in Centennial, Colorado.

Sponsored Recommendations

How to choose your diagnostic imaging technology

If any car could take you from A to B, what made you choose the one you’re driving? Once you determine your wants and needs, purchasing decisions become granular regarding personal...

A picture is worth a thousand words - Increase case acceptance with dental technology

How can you strengthen case acceptance at your practice? One way is by investing in advanced technology that enables you to make a stronger case for treatment and to provide faster...

Discover technology solutions to improve case acceptance

Case acceptance is central to the oral health of your patients and the financial health of your practice. Click here to discover how the right investments in technology can help...

What to expect when you invest in equipment and technology

Hear from 3 seasoned Patterson representatives as they share their firsthand knowledge of what an investment in equipment and technology means to a practice.