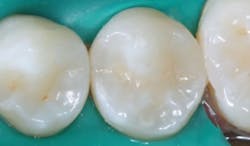
A reader is disappointed in the composites he places for Class II restorations and asks what he can do to avoid postoperative sensitivity, reduce open margins, and ensure there is no more recurrent caries on the gingival margins. Dr. Gordon Christensen says the composites we have today are very good and that, in his opinion, the problem is you and me. He offers suggestions to improve predictability and reliability.
Ask Dr. Christensen
Q:
I am disappointed to see a significant percentage of my Class II resin restorations degenerate over just a few years. The margins become open, pieces of resin often break off, some of the restorations have postoperative sensitivity, and I am seeing more recurrent caries on the gingival margins. What am I doing wrong? What can I do to improve these restorations?
A:
Resin-based composite restorative materials have evolved constantly over the nearly 60 years since their introduction. Although numerous manufacturers have attempted to introduce new types of polymers to overcome some of the weaknesses, the polymer portion of the materials has not been changed significantly.
These are a few of the points we can highlight about resin-based composites today:
•The major changes in these materials have been in the filler content and type. The fillers in the original materials were very large particles compared to those in resins today.
•The original resin-based composite restorative materials wore rapidly as the filler particles were “plucked” out of the resin. This problem has been overcome by most manufacturers by changing the filler type, increasing the amount of filler, and reducing the size of the filler particles.
•The polymerization shrinkage of resin restorative materials is still nearly 2%for most brands. Some brands are slightly less. This characteristic is negative and will be discussed later.
•The handling properties of current resins has been studied and modified for years, and most restorative brands allow relatively easy manipulation, placement, and finishing.
•Smooth surfaces can be developed on most of the resin brands if the finishing and polishing procedures are carried out properly.
The restorative resins we have today are very good! So, what is the problem? In my opinion, the problem is you and me.
What can dentists do better?
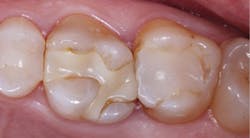
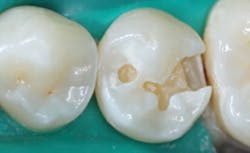
The tooth preparation, resin placement, finishing, and polishing of Class II restorative resins needs to be improved (figure 1). It has been estimated that typical general dentists place several resin restorations per clinical day. This is a low-revenue procedure for the time involved, compared to endodontics or fixed prosthodontics for similar time involvement. As a result, some dentists tend to accomplish the procedure too fast and move on to higher income-producing procedures. The result is that some Class II resin restorations could be better.
Figure 1: Many resin-based composite restorations degenerate over just a few years as shown in this typical image. The procedures described in this article will reduce such challenges.
Suggestions for improving predictability and longevity of Class II composites
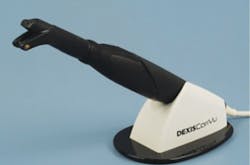
Identify Class II lesions when they are small. The current generation of periapical and bitewing digital radiographs do not show initial caries well. It is estimated that only one-third to one-half of initial caries lesions are shown in a typical periapical or bitewing digital radiograph. The following are some of the proven instruments that will enhance your ability to identify Class II lesions when they are small, thereby allowing smaller tooth preparations: DEXIS CariVu Caries Detection Device (figure 2);Logicon Caries Detector Software (available only for use with Carestream sensors); and Microlux Transilluminator System.
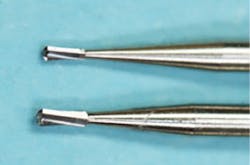
Figure 2: The DEXIS CariVu is an adjunct to normal digital radiographs and shows the actual extent of proximal caries better than digital periapical or bitewing radiographs. The 329 and 330 burs shown allow small tooth preparations to be made, thus reducing potential subsequent cusp breakage, making the restorative process faster and prolonging restoration longevity when compared to large tooth preparations.
Make small Class II tooth preparations! Unfortunately, one of the most-used burs for Class II preparations is a #557. This bur cuts a wide, right-angled slot in the tooth and, because of the cross-striations, makes ultrasonic vibrations in the tooth, potentially causing cracks. These particular burs should be abandoned. Since the mid-1970s, use of small burs with rounded ends has been proven to be more acceptable to retain tooth strength (figure 2).
Use a proven matrix system. Open contact areas were a problem with Class II restorations in the past. Several companies now dominate the matrix system market for Class II restorations. Among them are Dentsply, Garrison Dental, Greater Curve, Triodent, and Ultradent Products. When any one of these matrices is used properly, there is no reason to have open contacts on Class II restorations.
Use a potent disinfectant on tooth preparations. It has been proven that microorganisms continue to live and create caries if tooth preparations are not disinfected. Numerous disinfectants and desensitizers are desirable to place on tooth preparations. Chlorhexidine, benzalkonium chloride, and glutaraldehyde are examples. In vivo research at Clinicians Report Foundation has shown that use of two one-minute applications on tooth preparations will disinfect and desensitize the tooth.
Upgrade to a state-of-the-art curing light. Several research projects conducted in North American dental offices have shown that most curing lights being used in general practices are not adequate due to small-diameter curing guides, debris on the tip of the light guide, the wrong angle on the tip of the guide, and—most importantly—improper aiming and timing of the light. Examples of well-proven lights are: 3M, Dentsply, GC, Ivoclar Vivadent, Kerr, Ultradent, and others (figure 3).
Ensure that you are curing the resin well. Most current curing lights can cure deeply. The light tip should be as close to the resin as possible, and the light beam should be aimed perpendicular to the surface of the resin. Not aiming the light perpendicular to the resin surface markedly depreciates the energy getting to the resin.
Figure 3: The Valo Grand curing light from Ultradent Products is representative of the desirable characteristics in a current light with its wide curing tip and right-angle direction of the light tip.
Most companies now sell bulk-fill resins. Most of the bulk-fill products are very good, but some dentists are not curing adequately. Regardless of whether you are using the bulk-fill technique or not, test a sample of the resin (approximately a 10-mm piece) out of the mouth to determine how deeply your light is curing. This simple test may surprise you. Some lights cure only a few millimeters.
If using the bulk-fill resin procedure, I suggest using a normal bonding material and technique to place a small amount (approximately 0.5 mm) of resin in the depth of the box forms of Class IIs. Cure this small amount of resin before placing and curing the subsequent bulk portion. Research shows that this procedure reduces potential opening of the gingival margin due to the 2% polymerization shrinkage of the resin. In surveys we have conducted, most dentists prefer and still use the incremental placement and curing procedure.
Another procedure to reduce or eliminate polymerization shrinkage of resin in the box form is to place dual-cure resin in the box forms of the prep. Example brands are Bulk EZ from Danville and HyperFIL from Parkell. Inadequate curing is among the most deficient procedures in the Class II resin-based composite technique, and it is doubtful that many dentists know of this significant challenge.
Use air coolant while curing. The high-energy intensity of current lights creates significant heat. An air stream from your air syringe applied to the tooth being treated while the resin is being cured is mandatory to keep the tooth cool, reduce postoperative tooth sensitivity, and avoid subsequent need for endodontic treatment.
Do not overfill the tooth preparation. This common practice requires significant finishing and produces lack of ability to locate the tooth preparation margins without mutilating them. A technique that allows optimum finishing and polishing is to place only about 0.5 mm of resin over the tooth preparation margin. This allows adequate resin excess for finishing and visibility of the margins.
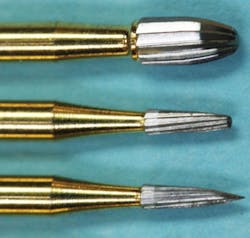
Use sharp rotary instruments and gentle technique when finishing. Finishing with either diamonds or carbides is well accepted. Most Americans use carbides, but both procedures work well. Burs that have been proven to produce smooth surfaces and avoid “white lines” (mutilated enamel and restorative material) are shown in Figure 4.
I suggest a new, previously unused 7406 12-bladed bur for any occlusal surfaces that can be reached with this shape of instrument. The sterilized 7406 bur can later be used for occlusal equilibration, denture tooth modification, and other procedures. Using a sterilized, dull bur guarantees production of the dreaded “white line” around restoration margins.
Figure 4: Twelve-bladed trimming and finishing burs or similar size diamond rotary instruments are the primary finishing instruments for Class II resins. Used properly, they can produce excellent resin surfaces without the presence of a “white line”—mutilated tooth structure and composite—on the restoration margins.
The following burs do not need to be new, since they are cutting primarily resin and not tooth structure. The 7901 is used to remove occasional gingival overhangs, and the 7801 is used to place grooves and sluiceways in the resin. The rotary finishing instruments should be used at low speed with loupes on—preferably in an electric handpiece without water spray, which eliminates optimum vision—and with a very light shaving touch to avoid margin damage.
A small tooth preparation made with a 329 bur and a restoration finished in the above-described manner is shown in Figure 5.
Figure 5: Tooth preparations should be made as minimal as possible, such as the ones in the premolar made with a 329 bur. Proper finishing and polishing can produce restorations that will serve patients for many years.
Summary
Class II resin-based composites are bread-and-butter procedures for general dentists. They can be accomplished relatively fast, and they can be predictable, nonsensitive, and profitable, assuming dental assistants and dentists are coordinated in their knowledge about the materials and techniques required. The procedures included in this column will improve the predictability and longevity of Class II composites for you.
Author’s note: Additional educational information from Dr. Gordon J. Christensen, Practical Clinical Courses:
Two-day courses in Utah
• Implant Surgery—Level 1: September 29–30, 2017
• Restorative Dentistry 2—Fixed Prosthodontics: October 13–14, 2017
One-hour videos
• Class II Composite Resins Can Be Predictable, Non-Sensitive, and Profitable: Item No. V3554
• Mastering Frequent Esthetic Challenges with Resin: Item No. V3582
• Top Insurance Coding Strategies: Item No. V4783
• Avoiding Common Administrative Errors: Item No. V4784
Gordon J. Christensen, DDS, MSD, PhD, is a practicing prosthodontist in Provo, Utah. He is the founder and CEO of Practical Clinical Courses, an international continuing education organization founded in 1981 for dental professionals. Dr. Christensen is cofounder (with his wife, Dr. Rella Christensen) and CEO of Clinicians Report (formerly Clinical Research Associates).

