Conventional impressions or scanning for fixed prosthodontics?
Q: I have been advised by some of my distributor reps that it is time for me to get a scanner for my day-to-day impressions for crowns and fixed prostheses. The cost of the scanners seems prohibitive, but they look very promising. It is obvious to me that the cost of a scanner would buy years of impression material. Should I stay with my usual vinyl polysiloxane (VPS) and polyether impression techniques, or is it time to get a scanner? What advantages would it provide for me and my patients?
A: You are correct! The cost of scanners is high. However, they have several advantages that may not be obvious when considering just the cost. Clinicians Report Foundation studied some of the first scanners years ago and found the advantages to be significant enough to continue with evaluations throughout the following years. These are some of the proven advantages of scanning impressions for crowns and fixed prostheses.
Easy visibility—The scanned images of your tooth preparations on a computer screen are many times larger than observing the actual tooth preps, even when using high-power loupes.
Improved prep quality—Your preps will improve because you will see the flaws on a large computer screen and can modify them.
Increased patient comfort—Patients do not gag as much because the presence of a scanner placed carefully in the mouth is not as objectionable as a mouthful of impression material.
Less mess—Impression material debris is not left on the patient’s face or mouth because no impression material is used.
Better infection control—Infection control is much easier, requiring only a disinfection of the camera handpiece, and lab technicians do not have to tolerate and deal with contaminated impressions.
Speedier transfer to your lab—Your lab receives your scanned impression with just one click of your computer.
Potential cost savings—Depending on the volume of your impressions, the cost of digital impressions can be lower than the cost of impression materials over a few years of use.
Which brand of scanner is best?
We are often asked which brand of scanner is best. That is a difficult question. I suggest that when you are ready to buy a scanner, go to the next large dental meeting in your area and look thoroughly at the scanners listed in this article. Evaluate them using the desirable characteristics below. Keep in mind that none of the scanners currently available will have all of these characteristics (figure 1).
Small camera head. Almost all of the devices have a camera head that is far larger than desirable. The Midmark device (previously the 3M True Definition Scanner) and the CARES scanner from Straumann have the smallest camera heads, but camera heads are only one of the limiting factors of scanners. Future camera heads should be reduced in size to facilitate easier use of the cameras, especially in the posterior area of the mouth.
Small camera body. Most of the brands have a large and sometimes heavy electronic package as the distal portion of the camera handpiece. Future camera bodies should be reduced in size and weight. Although a formidable task, a wireless scanner the size of a pen or pencil would be attractive to every restorative dentist.
No reflective powder needed. Among the current brands, only the Midmark device requires powder. Although not a significant impediment to experienced users, eliminating that challenge would be a great improvement.
Wireless operation. Wireless operation of the camera is a significant advantage. However, most brands do not have this characteristic. The absence of cords makes the device easier to use, but this feature costs more.
Small, mobile computer. Some brands have a large computer to carry all of the storage necessary for scanning. Where do you put such a computer? It can be inconvenient. Smaller is better.
No cart to carry the computer, monitor, and supplies. Most companies have determined that a cart is objectionable and have eliminated it. Others still have a cart. There are already too many technology carts for other clinical purposes taking up space in the operatories.
Minimal costs for data plan and extended warranty plans. Some of the companies have significant costs for data plans and extended warranty plans. In such cases, the initial price is just one of the charges for scanning. Check into these costs before making a brand decision.
Intuitive software. This characteristic varies among brands, but the use of the scanner should be easy.
All of the scanners listed in this article work adequately, but they vary in the characteristics discussed here. When choosing a scanner, I suggest that you physically compare the brands. This will require some time, but the comparison will be invaluable. Only by comparing the characteristics of the various brands can you select the scanner that is most adequate for your practice. Currently, the following brands (listed alphabetically) are reported by dental laboratories to be the most used in the US.
- CARES Scan (Straumann)
- CEREC Omnicam or Primescan (Dentsply Sirona)
- CS 3600 (Carestream)
- Emerald Scanner (Planmeca)
- iTero Element 2 (Align Technology)
- Trios (3Shape)
- True Definition Scanner (Midmark)
Numerous others are coming on the market soon.
Can every tooth preparation be scanned easily?
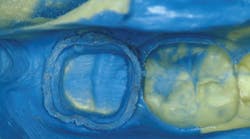
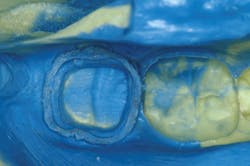
The answer depends on each individual patient’s physical characteristics and the type of tooth preparations the dentist usually makes (figure 2). If the majority of indirect restorations are onlays or inlays, most can be scanned easily. However, if the preparation margins are deeply subgingival, scanning is often nearly impossible because of soft-tissue interference and the presence of contaminating fluids. Talkative patients impede adequate scanning. Patients with excess saliva impede adequate scanning. Inability for patients to open their mouths wide complicates scanning. However, in a typical general practice, only a small percentage of patients cannot be scanned relatively easily. I am a prosthodontist, and many of the difficult multitooth cases are difficult to scan.
What are the negatives for scanning tooth preparations?
There are some limitations that may delay the integration of scanning into your practice. Among them are high initial cost, data plans that incur a fee every month, time and effort to learn the new technology, educating your staff about the new concept, occasional software changes, finding the appropriate location in your office to locate the scanner, and changing your office routine. Research by Clinicians Report Foundation and others has shown that the accuracy of digital impressions is adequate but not as detailed as impressions made with VPS or polyether. But, in my opinion, the advantages of scanners outweigh the disadvantages.
What are the alternatives if you do not want to move to scanning now?
Ninety percent of crowns placed in the US are single crowns. I suggest that you may want to upgrade and decrease the time involvement for your single-crown technique. By using the concepts, techniques, and materials described below, the time involvement and patient-treatment cost for single crowns can be reduced. This is a simple, enhanced technique for one or two single crowns.
- Diagnose and treatment plan for the crown(s).
- Apply anesthetic.
- Prep down to (but not below) the gingiva, leaving all of the previously placed restorative material in place.
- Place a soft-cotton, nonimpregnated packing cord. Most posterior teeth need a #2 or #1 cord to fill one half of the sulcus. Ultrapak (Ultradent) nonimpregnated #2 cord is very popular.
- Remove the previously placed remaining restorative material.
- Place your choice of filler or buildup material in the voids. For small holes, I prefer Dyract eXtra (Dentsply Sirona), which is a bonded compomer, or one of the newer conventional glass ionomers, such as Equia Forte (GC America) or Ketac Universal (3M). For a buildup, if one half or more of the coronal tooth structure is gone, use a bonded composite buildup material of your choice.
- Finish the tooth preparation nearly to the first cord.
- Place a second cord, slightly moistened with ViscoStat Clear styptic (Ultradent). Among the best second cords is Stay-put (Coltene/Whaledent), which has a small copper wire in it.
- Remove the second cord.
- Immediately make the impression with the elastomer of your choice in one of these trays—Sideless Triple Tray (Premier) or Quad-Tray (Clinicians Choice).
- Make a provisional restoration.
This technique is fast, effective, and almost foolproof! You can search on the internet for any of the products listed here. For additional information, order the videos at the end of this article.
Summary
There is no doubt that scanning tooth preparations for indirect restorations is here and growing. The remaining question is: Are you ready to incorporate scanning into your practice? Only you can answer that question. Look over the devices that are available and make your decision. If you aren’t ready for scanning yet, try the relatively foolproof conventional technique described in this article for one or two crowns.
Author’s note: The following educational materials from Practical Clinical Courses will help you and your staff learn more about restorative materials.
Videos:
- Affordable Treatment for Complex Restorative Needs (Item No. V1964)
- Foolproof, Fast Single-Crown Procedure (Item No. V1180)
Two-day hands-on courses:
- Restorative Dentistry 2—Fixed Prosthodontics—with Dr. Gordon Christensen
- Faster, Easier, Higher Quality Dentistry—with Dr. Gordon Christensen
For more information about these educational products, call (800) 223-6569 or visit pccdental.com.


