HAVING BOTH DIGITAL AND TRADITIONAL IMPRESSION TECHNIQUES to use at our discretion is truly a luxury, but the real question is knowing when to use which. As dental professionals, we take different impressions, whether for crowns, removables, or implants. Almost everything we do for patient care starts with impressions. Impressions are the foundation for dental restorations. With every option we have in each of the digital and physical spaces, if we don’t know the benefits and limitations, our treatment quality often becomes chance. So, with all the different materials and techniques, how does one choose what to use and when? It is always my recommendation to use what works best in your hands. Digital scanning has made great strides in the last decade, and it is getting better and better every day. But there is a learning curve that comes with it. Once you make it past the hump, going digital can change your practice. So where does that leave traditional impressions?
In the past, we often used different techniques and different technologies for different treatments. We had a preferred path for traditional crown and bridge, one for implants, another for Invisalign, and still another for surgical guides. Scanning has been great to streamline our care for many treatments. However, scanning has limitations. By the numbers, full-arch implant cases are still more predictably impressioned physically. Removable cases that are largely tissue-borne are the same.
Assuming you’ve done your research on where the accuracy of physical impressions outweighs the digital, determining which physical impression delivers the best results is key. So, in a practice that is primarily digital, when we are going to take a physical impression, we have two sets of needs—ours and our patients’.
On our clinical side, we need materials that deliver exceptional detail, stability in and out of the mouth, and ideal tear strength. Equally important is what we need on the patient side: fast set times, neutral scents, and neutral flavors.
In dental practice today, there are still important roles for physical impressions. Having the ability to scan and a go-to physical impression material will streamline your systems and your overhead, as long as you are aware of the limitations of each and you have a technique that works.
Cases where I always use traditional impressions are for anything tissue-borne and when I have multiple implants together. Studies show that for full-arch implants, physical impressions, when done with the proper technique, are more accurate than their digital counterparts (this depends on your specific scanner, so be sure to check!).1 For me, having control over the impression and utilizing the method for ligating the impression copings together increases my accuracy and predictability.2
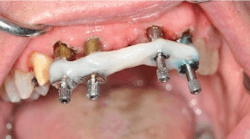
Whenever impressioning multiple adjacent implants, I like to start with either a custom tray or a tray with holes where the copings push through. Next, I seat my impression copings and take a radiograph to ensure that they are fully seated. Once I know they are seated correctly, I ligate the impression coping together with floss. I use a slip knot at the end to help keep the floss taut around the copings, and then I wrap it in a figure eight pattern around all of the abutments (figure 1).
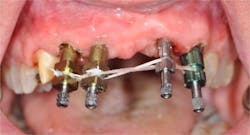
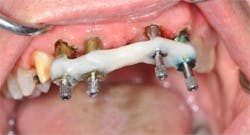
I use an acrylic resin material (Telio, Ivoclar) to splint the copings together (figure 2). The floss works to support the materials and prevents it from sagging. Once the material has set completely, I section it with a fine disk between the copings to remove any shrinkage that may have occurred (figure 3). Then, I reconnect the copings with more acrylic resin and wait for it to fully set.
At this point, I feel confident that my impression will accurately represent the implant positions. I use a light body VPS material (Honigum Pro Light, DMG) around the copings and the jig, ensuring that the impression material gets underneath as well. I like the light body for this as the flow helps ensure that every detail is captured.
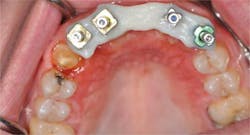
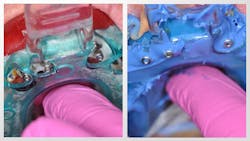
Next, I seat the loaded tray with a heavy body material (Honigum Pro, DMG). This material affords me the rigidity to lock everything in place, so I am confident that nothing shifts while pouring up my model. Care must be taken to make sure that the impression copings are accessible to the holes previously made in the tray, so the jig and impression can be removed in one piece (figure 4).
This process for taking a final impression is an investment in chair time up front, but it will save a lot of headaches and lab bills down the road. This is a technique that has helped me in my practice, and I hope it helps you too!
References
1. Kim KR, Seo KY, Kim S. Conventional open-tray impression versus intraoral digital scan for implant-level complete-arch impression. J Prosthet Dent. 2019. doi:10.1016/j.prosdent.2018.10.018. [Epub ahead of print]
2. Ahlholm P, Sipilä K, Vallittu P, Jakonen M, Kotiranta U. Digital versus conventional impressions in fixed prosthodontics: A review. J Prosthodont. 2018;27(1):35-41. doi:10.1111/jopr.12527.
NEXTGEN LEADERSHIP SHOWCASE
In this article series, we are featuring articles from the next generation of dental key opinion leaders. The online versions of these articles feature video interviews with the authors. Find previous articles in the series by Drs. Amisha Singh, Sarah Winter, Nathaniel Lawson, Kathryn DeWood, and Albert Ambriz on dentaleconomics.com. Search "NextGen."
