2003 De Clam P06 5e6165aa128bd

Abracadabra! The use of a single-shade direct composite to create restorations that disappear

March 1, 2020
Dr. Douglas Lambert presents three cases demonstrating the use of a new kind of composite that esthetically matches every patient, from A1 to D4, with a single shade of composite.

Magic. I’ve been intrigued by it since I was a child. The illusions created tease our minds. Whether it is a card trick, pulling a rabbit out of a hat, or making someone disappear, magic tricks leave all of us asking one question: How did they do that? 

In our practices, the direct composite resin has become a mainstay in daily patient care. Over the past several years, numerous advancements in the resins themselves, enamel and dentin bonding agents, curing light capabilities, and the placement and finishing of these materials have all led to improved patient outcomes. However, one challenge can still remain an elusive target for the practitioner—matching the composite restoration with the surrounding tooth structure.

Numerous variables play a role in creating a lifelike final result: the chroma, hue, and value of the tooth itself; size of the restoration; layering approach; formulation of the material; particle size; texturing; finish; and polish, just to name a few. The shade guides included in the composite kits offer some assistance in shade selection, but most are based on the Vita Classic shade guide created in the 1950s for denture teeth, and consequently do not tend to “match” the shades of the actual composite material. One trend in the industry today seems to be moving toward a condensed shade assortment to help simplify the shade selection process, allowing dental offices to stock fewer materials.

But there appears to be a little bit of a “disappearing act” going on in dentistry today. Omnichroma (Tokuyama Dental America) is the first in a new kind of composite that esthetically matches every patient, from A1 to D4, with a single shade of composite. It is a single-shade structurally colored technology designed for use with most anterior and posterior direct restorative cases. The wide color-matching ability takes the guesswork out of shade selection by mimicking the color of the restored tooth. The need for a shade-taking procedure is eliminated, and it meets the financial goal of reducing composite inventory. 

Case no. 1

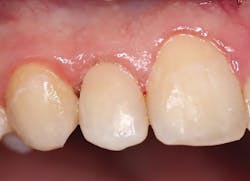
A 20-year-old male presented with numerous class V decalcification lesions, some of which extended through the enamel and required a direct restorative approach (figure 1). After anesthesia was obtained, removal of the caries with a pear-shaped carbide bur (#330 NeoBurr, Microcopy Dental) was completed. An enamel bevel of 2–3 mm with an irregular outline was placed with a 45u flame-shaped diamond (209.6 VF, Premier Dental) to facilitate enamel etching and blending of the composite. The preparation was isolated using a clear Mylar-based matrix (Margin Perfect Matrix). A total-etch technique was employed, followed by the use of a universal bonding agent (Tokuyama Universal Bond, Tokuyama Dental America) according to the manufacturer’s instructions. A single application of Omnichroma was expressed and manipulated with composite instruments and brushes prior to curing with an LED light source for 20 seconds. Once the matrix was removed, finishing was accomplished with 12 fluted spiral-bladed carbide burs (H48L-010, H274-016, Brasseler USA), and final polish was achieved with a series of abrasive cups and points (Astropol, Ivoclar/Vivadent) to a final luster (figure 2).
Case no. 2

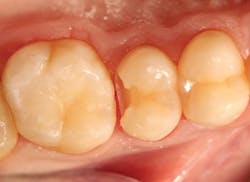
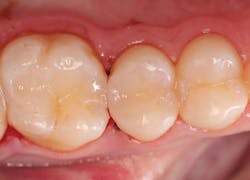
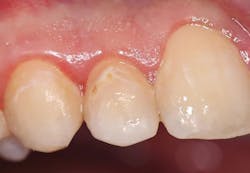
A 19-year-old female presented with a class II lesion on tooth no. 4. After local anesthesia, a conservative slot preparation was accomplished using a #330 pear-shaped carbide, and the remaining caries was removed with a slow-speed round bur (figure 3). A 1–1.5 mm enamel bevel was placed at a 45-degree angle on the occlusal and proximal margins with the very fine flame-shaped diamond (45u) to enhance the enamel etch and marginal seal. The preparation was isolated with a ring-based sectional matrix system (Palodent Plus, Dentsply/Sirona). A selective-etch technique of the enamel margins was employed, and the universal bonding agent was applied according to the DFU. Then, it was light cured for 20 seconds. Omnichroma was placed in two separate increments in the class II preparation, and then condensed and shaped with composite instruments. Each layer was exposed to the LED curing light for 20 seconds from the buccal, lingual, and finally, occlusal. After removal of the ring, wedge, and sectional matrix, the occlusion was checked in the usual manner, and shaping and polishing were completed using the same carbide burs and abrasive cup/point system as the class V restoration in case no. 1 (figure 4).

Case no. 3

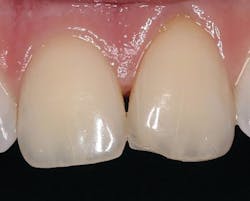
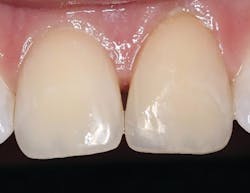
A 28-year-old male fractured the mesial-incisal of tooth no. 9 in a sporting event (figure 5). The tooth was asymptomatic, and no anesthesia was necessary. A 2–3 mm irregular-shaped bevel was prepared using a very fine diamond (45u) with an emphasis on a heavier bevel at the fracture margins and feathering to an infinite bevel approach away from the fractured portion. This not only helps to give the composite more surface area to bond to, but it also creates sufficient thickness to hide the fracture line and allow the material to optically blend into the surrounding tooth structure. After isolation with a Mylar strip, a total-etch technique was utilized followed by Tokuyama Universal Bond. Since the incisal fracture possessed both dentinal shading and a highly translucent enamel component, a two-step approach was implemented for the restorative phase. An increment of the Omnichroma resin was expressed and shaped to mimic the dentinal mamelon effect, and then cured for 20 seconds from the labial and lingual with an LED light. A layer of a translucent composite (Estelite Omega Trans, Tokuyama Dental America) was placed over the cured Omnichroma to give the desired enamel result. After light-curing, interproximal finishing was obtained with a composite strip system (ContacEZ), and occlusion was verified. Shaping was accomplished with the 12 fluted carbides and polished with the abrasive cup and points (figure 6).  
Douglas L. Lambert, DDS, FACD, FASD, FASDA, FICD, is an international author and lecturer and part of the education team for the postgraduate course in comprehensive, esthetic, and implant dentistry at the University of Minnesota School of Dentistry. He serves as an independent researcher for many dental manufacturers and as team dentist for the Minnesota Lynx of the WNBA. Dr. Lambert maintains a dental practice in Edina, Minnesota.
About the Author

Douglas L. Lambert, DDS, FACD, FASD, FASDA, FICD

Douglas L. Lambert, DDS, FACD, FASD, FASDA, FICD, is an international author and lecturer and part of the education team for the postgraduate course in comprehensive, esthetic, and implant dentistry at the University of Minnesota School of Dentistry. He serves as an independent researcher for many dental manufacturers and as team dentist for the Minnesota Lynx of the WNBA. Dr. Lambert maintains a dental practice in Edina, Minnesota.

Sponsored Recommendations

How to choose your diagnostic imaging technology

If any car could take you from A to B, what made you choose the one you’re driving? Once you determine your wants and needs, purchasing decisions become granular regarding personal...

A picture is worth a thousand words - Increase case acceptance with dental technology

How can you strengthen case acceptance at your practice? One way is by investing in advanced technology that enables you to make a stronger case for treatment and to provide faster...

Discover technology solutions to improve case acceptance

Case acceptance is central to the oral health of your patients and the financial health of your practice. Click here to discover how the right investments in technology can help...

What to expect when you invest in equipment and technology

Hear from 3 seasoned Patterson representatives as they share their firsthand knowledge of what an investment in equipment and technology means to a practice.