Using 3-D printing to improve removable denture workflow
For decades, there have been relatively few improvements to making removable dentures more efficiently. We take a primary impression, then a secondary impression, use wax rims to try to establish occlusion and tooth position, check an anterior setup try-in, and then a full try-in. At some point in between these steps, we probably have to send the case back to the lab because the setup isn’t right.
We always hope that the patient presents with a serviceable set of dentures that the lab can duplicate for use in the process, but that means the patient has to go without dentures for a day or more. Before you know it, you have expended 10 appointments and lost every possible dollar of profit that you had hoped to make from the case.
With digital scanning and 3-D printing, we can shortcut the denture process without losing quality of the final product. In fact, for many cases, the quality is improved over our age-old workflow. There are several ingenious doctors out there whose workflows are fully digital—from impression, to setup, to 3-D printing of the denture itself using the latest materials. The downside to this process, however, is that it requires significant doctor time and an understanding of the software. Many dental laboratories are skilled in various software programs that can design the dentures for us, but the process often requires multiple try-in appointments and extra steps to communicate the changes needed.
In my office, we have moved to a hybrid workflow using digital scanning and 3-D printing along with traditional wax try-in steps. This workflow has made communication with the laboratory simple because there is a plethora of information provided at one appointment. Patients no longer have to go without their old dentures for any amount of time. We are still able to work artistically with the patient at chairside to find the optimal setup and tooth positions. The more efficient workflow allows us to provide a great final product for our patients at a lower overhead cost. These are the steps in our workflow:
No. 1: Consultation
No. 2: 3-D print the dentures
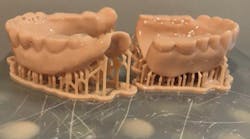
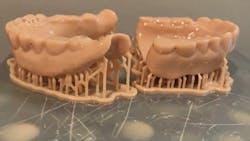
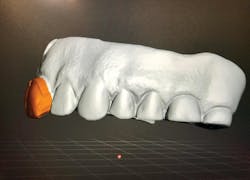
Once the patient has decided to move forward and has made a financial commitment, we print the dentures using a Formlabs Form 2 printer (figure 1). If, from the consultation appointment, we feel that significant changes to the anterior setup will be required, we make simple modifications using Meshmixer software (Autodesk Research) to elongate/shorten/position the centrals (figures 2 and 3). There are many great new resins coming out on the market specifically for 3-D printing of dentures that you can use.
No. 3: Prepare prints for next appointment
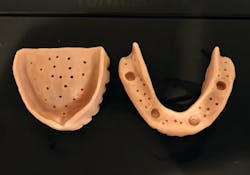
Once cleaned and cured, the newly printed dentures are prepared for use as custom impression trays, bite registration, development of anterior tooth position, and communication of the desired tooth size and shape. If the flanges were deemed to be overextended, remove approximately 2 mm from them. Remove all sharp points created from the printing supports. With a #4 round bur, punch holes in the intaglios so the impression material can flow throughNo. 4: Make final impressions
Using the 3-D printed duplicate dentures as custom trays, we take our final impression with polyvinyl siloxane (PVS) material, ensuring that proper borders are established. At this point, the final position of the maxillary centrals is established. It can be as simple as drawing a line on the current setup or adding composite resin to change the length or profile position. The occlusal plane is registered and photographed for the lab, and finally occlusal relation is established. We frequently need to open the patient’s vertical dimension, which can be done easily by adding acrylic to the duplicated denture teeth at chairside.
No. 5: Full wax try-in
No. 6: Delivery
I have no doubt that in the future we will move toward more steps being done digitally. The convergence of digital images of smiling patients and designs for their future dentures is exciting and will continue to improve the overall process. For now, this hybrid approach of scanning and printing removable dentures, followed by analog impressions, and then try-in has greatly improved our efficiency and results.
Craig Harder, DDS, a native of Spokane, Washington, is a 1995 graduate of the Creighton University School of Dentistry. He practices in Moses Lake, Washington, and previously served as the Grant County Health Department’s dental liaison as well as Access to Baby and Child Dentistry champion.
