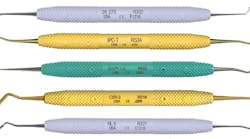
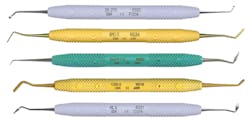
Restorative instruments by Paradise Dental Technologies (PDT)
Ever since I graduated from dental school, nearly every single practice I have worked in, including my own, has used Paradise Dental Technologies (PDT) hygiene instruments. I know that because it’s pretty easy to spot PDT instruments, even from across the room. They have a distinctive colored plastic handle with great gripping texture. Their most beloved hygiene instrument is the Montana Jack. We must have 30 of them around the office. Every single hygiene kit and every single crown delivery kit has one in it. It’s a fantastic instrument, as are all of PDT’s other hygiene instruments. PDT is well known as a great hygiene instrument company. What I didn’t know is that they are also a great restorative instrument company.
For most of my career, I figured that all restorative instruments were about the same. I just couldn’t see much difference between the ones I had used. Recently, we needed some new hygiene instruments, so we had the catalog out, and we were putting together an order. I was surprised to find the page with restorative instruments. Knowing that I also needed a new composite setup, we ordered one tray’s worth of PDT restorative instruments. When the shipment arrived, we put together the new composite setup, and I used it the next day. I noticed a difference right away, and I wanted that setup sterilized immediately so I could use it again ASAP! The difference was mind-boggling—the restorations were so much easier with the PDT instruments.
I used the 26/27S ball burnisher to lightly pack and compress composite. The instrument worked without sticking and shaped the composite beautifully. Next, I picked up the IPC-T. I am assuming the T stands for thin because this IPC (interproximal carver) is thin and sharp. After that, I picked up an instrument called the DrV 1-2. The DrV 1-2 has a very long, sharp PKT end that works nicely for placing grooves in composite. The other end looks like a broken explorer. This broken explorer end is perfect for adding the central groove and triangular fossae. It made adding secondary anatomy to my posterior composites simple and easy. We also have a CSS-3—a plastic instrument on one end and condenser on the other—and a Hollenback 6 on the tray. We have since overhauled all of the composite setups with PDT restorative instruments.
I have learned my lesson when it comes to restorative instruments. They aren’t all created equally. Investing in quality can save you time and frustration while allowing you to create superior restorations. Smash-hit triple over the center fielder’s head for PDT!
Slick Band margin elevation matrix by Garrison Dental
It is no secret that I am a massive fan of sectional matrix systems for Class II restorations. They are superior to matrix bands in almost every way. The shortcomings of sectional matrix systems are few, but there are some. First, a clinician must gain some experience using a sectional matrix system to become fully competent with it. There can be a learning curve to selecting the correct ring, matrix, and wedge for various situations we might encounter. The second disadvantage is that there are a few restorative situations in which a sectional matrix cannot be used. One of those is the distal of a terminal tooth in the arch. A neighboring tooth is required for the ring to rest against. Decay that is deep gingivally can also make sectional matrix use difficult or impossible. The problem in those situations is that it is hard to get the wedge deep enough to close the matrix gingivally, so we might end up with an overhang or flash, or the matrix might be unstable against the cavosurface margins. Deep decay can be difficult to deal with because of this. Luckily for us, Garrison Dental Solutions offers a product that can help remedy this exact situation.
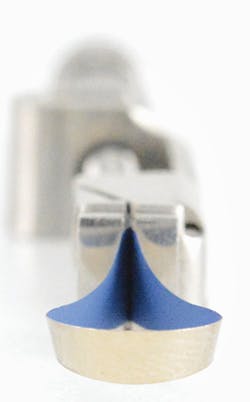
The Slick Band margin elevation matrix from Garrison Dental Solutions can be a lifesaver in those deep situations. The margin elevation matrix band goes into a standard Tofflemire-style matrix retainer and looks similar to a traditional matrix band. The difference is in the middle of the band. The gingivo-occlusal thickness of the middle segment of the margin elevation matrix band is only a few millimeters wide, while the thickness of the ends is the same as a traditional matrix band. The thin portion fully adapts and conforms to the tooth at its deepest point to give you great isolation. Since the band is only a few millimeters thick in this area, it allows you to place an increment of composite in the deepest part of the box with good isolation. This raises the gingival margin above the gingiva, where the gingival margin of a small Class II lesion would be. Then, you can place a sectional matrix, just like you might in a simpler situation.
You might be asking yourself, “Why not just use a deep matrix band in a Tofflemire retainer? Why add extra steps by putting on this margin elevation matrix band, bonding and placing an increment of resin composite, taking the band off, and then putting on a sectional matrix?” That is a good question with a good answer. If you use only a Tofflemire-style matrix band, you will have a difficult time getting a good interproximal contact and contours on your final restoration. Restorations, especially deep ones, done with Tofflemire-style matrix bands end up having point contacts and straighter interproximal walls. Point contacts and sharp, flat restorations trap plaque and are problematic for the patient. By taking the time to perform this extra margin elevation step, you get all the benefits of using a sectional matrix, such as more anatomical contours and better interproximal contact areas.
The Slick Bands have a nonstick coating and are trimmed anatomically to allow for great adaptation in subgingival areas. I don’t have to use these daily, thankfully, but I have them ready for when a tough, deep Class II comes along. I am always thankful I have them when the need arises. Double down the third base line for Garrison Dental!
Estelite Bulk Fill Flow composite by Tokuyama
I fondly remember one of my beloved dental school professors, Dave Overton, DDS, drilling (pun intended) the philosophies of minimally invasive dentistry into my class. Our early operative dentistry classes mainly revolved around amalgam. I remember thinking that amalgam and minimally invasive dentistry don’t always go hand in hand. If we removed all of the caries with a single stroke of our 329 or 330 bur, minimally invasive dentistry would have us stop there and restore. The problem was that we didn’t have condensers small enough for that kind of prep. We had to expand the prep to condense amalgam into it.
As resin composite became a larger part of the curriculum, things became simpler from a minimally invasive standpoint—no more removing tooth structure for retention and resistance form. However, we were taught to do incremental fill with resin composite. Once again, we ran into space and instrument issues with small preps. How were we to do incremental fill with a prep the width of a 330 bur? That is almost impossible to do.
This is a not an uncommon situation in my practice. I find myself restoring pit and fissure decay that is slightly into the dentin but hasn’t started expanding yet. That means that after I am done removing caries, the prep is literally the width of a 330 or maybe slightly larger. Making sure that we get resin composite placed in the prep with no voids can be a challenge. Preps like these are a perfect application for Estelite Bulk Fill Flow from Tokuyama.
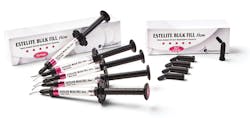
Estelite Bulk Fill Flow is the latest product in Tokuyama’s Estelite line. Estelite composites generally handle well and polish like a dream. Estelite Sigma Quick and Estelite Omega are both tremendous products. Estelite Bulk Fill Flow follows the trail blazed by its predecessors. One of the things that makes Estelite Bulk Fill Flow interesting is the fact that it is a flowable bulk-fill composite that does not require a capping layer. This composite can be used up to occlusion. It comes in five shades (universal, B1, A1, A2, A3) and is somewhat translucent like most other bulk-fill composites, but it blends in pretty well. Its cure depth of 4–5 mm means that many restorations can be done in one increment, and its physical properties allow it to do well on occlusal surfaces.
I had some issues sculpting this flowable when attempting to do a larger restoration all in one increment, but this product has a sweet spot for me with smaller restorations. I still prefer a typical paste-like composite for larger restorations when I am sculpting anatomy, but in minimally invasive situations, Estelite Bulk Fill Flow is an excellent choice. Line-drive base hit for Tokuyama!


