Each month, Dr. Gordon Christensen answers a question from our readers about everyday dentistry.
Q: I am frustrated with dental sealants, and I need some help on how to make them last longer. I have been a dentist for nearly 20 years and have had staff members place sealants for as long. The concept appears to be a viable one, but after watching them serve in the mouth over time, I find that sealants have numerous challenges. They look good when initially placed, but just a few years later, most are chipped around the edges, some have come off and have to be replaced, and others form caries underneath. How can we make sealants last longer?
A: We have been placing sealants since they were introduced into the profession several decades ago.- Was the staff member who placed the sealant adequately educated/trained on the procedure?
- Was plaque left in the groove before etching?
- Were dental caries left in the tooth under the sealant?
- Was the patient living in a fluoridated community?
- Did the acid etch work adequately?
- Was the tooth surface disinfected before placing the sealant?
- Was the sealant placed in an adequately dry and uncontaminated field?
- Was the sealant light cured properly?
- Was the sealant material wear-resistant?
These questions are pertinent to your comments. If all of them can be answered adequately, there is no reason for the sealants to fail. Apparently, the sealant technique needs scrutiny. The dismal international data shows sealant failures are causing many dentists to have the same questions as you.
I will answer each of the questions above and describe a well-proven technique to ensure that sealants stay in place. The following information has been accumulated by the research staff of Clinicians Report Foundation (CR) and augmented by the clinical observations of dentists, hygienists, and assistants working with CR.
Staff education/training
It seems apparent that those placing sealants should have adequate information relative to the procedure. However, this is not commonly observed, and it could be one of the major problems for sealant failure. Staff education can be easy. Set up an in-service education session with your employees. Obtain some groovyPlaque left in the occlusal grooves
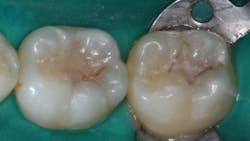
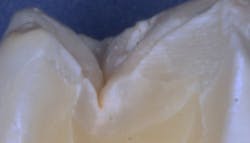
This is, perhaps, the most important reason for sealant failure. Some clinicians use an explorer to “remove” plaque from the grooves—not remembering that an explorer is at least 100 microns in diameter, and the groove can be as small as a few microns wide at the most apical level (figure 2). What does the explorer accomplish? It only pushes more plaque into the depth of the groove.
You can overcome this challenge by using an air polisher (figure 3) to remove the plaque from the grooves. The sodium bicarbonate slurry the air polisher provides is water-soluble. The particles become smaller and smaller as the water is combined with them, thus penetrating to the bottom of the groove and removing the plaque. Another advantage of using an air polisher is that if any color is left in the groove after using it, the likelihood of caries being present is almost assured. In this case, a restoration should be accomplished instead of a sealant.Remaining caries
Use of an air polisher will reveal caries as described by leaving remaining color in the grooves. Also, a drop of silver diamine fluoride (SDF) on the unetched and dried occlusal surface can show occlusal caries. When you allow the SDF to sit for a minute, it stains the caries. It is an excellent caries indicator that costs less than one dollar. Don’t seal teeth with overt caries in them. If overt caries is present, restore instead.
Fluoridated teeth
It is well-known that teeth have a layer of fluorapatite on the enamel surface, which takes time to accumulate. This layer is acid-resistant, and in high-fluoride geographic areas, the layer is more resistant to acid etching. You may have noticed this when placing resin on the proximal surfaces of anterior teeth to close a diastema. If the fluoride layer is not removed from the tooth, the resin often comes off during service. That fluoride layer is on all areas of any tooth being sealed. If the patient has been living in a fluoridated geographic area, acid etching needs to be thorough.
Thorough etching
The most recommended time for etching enamel is about 15 seconds with various concentrations of phosphoric acid (most popular is approximately 35%), followed by at least a 10-second wash and dry. In fluoridated geographic areas, 20 seconds of etching is recommended. When drying the tooth surface, if it is not “frosty” in appearance, repeat the etching and washing procedures. However, over-etching creates a weak bond. The word bond is somewhat of a misnomer. The main retention to enamel is caused by the thousands of 5- to 10-micron deep acid-etched irregularities in the enamel—not by a chemical bond. When thoroughly etched, the surface should appear “frosty.”
Disinfection
Apply two one-minute applications of 5% glutaraldehyde and 35% HEMA (2-hydroxyethyl methacrylate) immediately after the acid etch and wash to kill the remaining microbes. Gluma and MicroPrime are two examples. This has been shown to be essential in sophisticated long-term research performed by the TRAC component of Clinicians Report Foundation.
Dry, uncontaminated field
Resin placed and cured in a moist or contaminated operating field will fail. Products such as Isolite 2, Mr. Thirsty, or even a rubber dam in some cases can eliminate the moisture challenge after washing. If the etched area was contaminated with saliva or debris, redo the etch and disinfectant placement.
Light curing
One of the most negligent areas in restorative dentistry is adequate light curing. Have your curing lights been evaluated by a local distributor, or do you have a light tester? There are several LED curing light testers on the current market. It is generally accepted that a minimum of 1,000 mW/cm2 is recommended. For optimum curing, the light beam should be as close to the resin as possible. For a sealant, the beam should be perpendicular to the occlusal surface. During your staff in-service, find out how much time it takes to cure resin using your light. Cure a resin sample out of the mouth and observe the effectiveness of the cure. When curing sealants, the resin should be cured for the time you’ve found to be adequate.
Sealant wear
Make sure the sealant or flowable resin you are using as a sealant has wear characteristics similar to enamel. Check with the manufacturer or contact CR for advice at www.cliniciansreport.org. Proven flowable examples are Filtek Supreme Flowable Restorative (3M), G-aenial Universal Flo (GC), Beautifil Flow Plus (Shofu), and others. Following the guidelines above is essential for developing sealants that will serve indefinitely. The following information lists the sealant steps in the proper order. Several of these steps (1, 2, 3, 6, 7) are not currently common procedures but have been proven to be necessary for optimum success. Including these steps will add a little time to the procedure, but the result is well worth it.Procedure for sealants
- Clean grooves with an air slurry polisher or small bur.
- Neutralize remaining sodium bicarbonate with three-second etch using your typical acid, wash and dry.
- If still stained or with obvious caries, cut the prep and restore. If not, continue with sealant.
- Acid etch for the normal etch time (approximately 15 seconds).
- Wash and dry.
- Place glutaraldehyde/HEMA in two one-minute applications. Don’t wash; suction only.
- Place bonding agent and blow lightly with air to reduce film thickness.
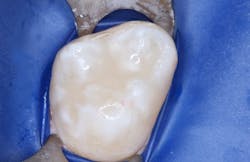
- Place sealant/flowable resin and cure (figure 4).
Summary
Sealants are known to be one of the most likely dental procedures to prematurely fail. Numerous studies estimate about five years of average longevity. The procedural steps and supportive narrative in this article will improve the longevity of sealants significantly.
Author’s note: The following educational materials from Practical Clinical Courses offer further resources on this topic.
One-hour videos:
- Sealants and Preventive Resin Restorations—When & How (V5143)
- Making Dental Caries Prevention a Win-Win Concept (V5120)
Two-day hands-on course in Utah:
- Restorative Dentistry 1—Restorative/Esthetic/Preventive with Dr. Gordon Christensen
For more information, visit pccdental.com or contact Practical Clinical Courses at (800) 223-6569.
About the Author

Gordon J. Christensen, DDS, PhD, MSD
Gordon J. Christensen, DDS, PhD, MSD, is founder and CEO of Practical Clinical Courses and cofounder of Clinicians Report. His wife, Rella Christensen, PhD, is the cofounder. PCC is an international dental continuing education organization founded in 1981. Dr. Christensen is a practicing prosthodontist in Provo, Utah.


