Q:
For the past few years, I have been placing large quantities of composite into tooth preparations at one time (bulk filling), as promoted by many companies. It seems to save clinical time for me, but I am now seeing some difficulties. After a few years of service, some of the restorations have obvious open margins, especially on the occlusal surfaces. I am also seeing caries around some of the restorations on the apical portions of the proximal box forms. Is the bulk-filling technique comparable to the previously suggested and promoted incremental resin placement technique? Should I go back to placing resin incrementally?
A:
Bulk filling of tooth preparations for composite resin was initiated a few years ago, and it is now suggested by most resin companies. The proposed advantages were that the bulk-fill technique saved time and was easier than placing resin in small 1 mm to 2 mm increments (figure 1). Many dentists changed to bulk filling and enjoyed success. But many dentists have changed back to the incremental placement techniques after encountering challenges with the bulk-fill technique. It is my observation from my many CE presentations that the majority of dentists are again using the incremental placement procedure.
MORE FROM DR. GORDON CHRISTENSEN | Are the changes in fixed prosthodontics mandatory for you?
I believe that clinical success can be achieved with either procedure. The following information contains my observations on how the bulk-filling procedure can be successful if you want to use it, and why some dentists have had problems with the procedure.
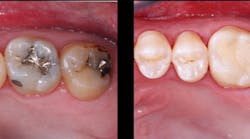
Figure 1: Most dentists place large Class II resin-based composite restorations routinely. However, their clinical longevity has been shown to be only several years. The size of many of these restorations has motivated dentists to place large quantities of resin all at once. This technique can be very good or significantly problematic, depending on how it is accomplished. Note the presence of slight "white lines" on the first molar margins caused by overfinishing the restoration.
Curing resin placed in bulk quantity
One of the significant challenges with the bulk-fill technique is ensuring adequate cure of a large quantity of resin. Research has shown that most resins will cure deeply if an adequate curing light is used and if the light energy is delivered to the resin properly. Our research at the Clinicians Report Foundation has shown that most current high-intensity curing lights, when used properly, will cure in the range of 4.5 mm to 9.5 mm deep for most A2-color brands of resin, with the majority in the 5 mm or 6 mm depth range. Of course, low-intensity lights do not cure as deeply.1 I suggest that you check the depth of cure for your light, using the resin you use routinely and following this procedure:
• Place a quantity of resin you normally use about 10 mm high and 5 mm in diameter on a piece of paper.
• Place your light tip directly over the resin and cure the resin for the time you normally cure in practice.
• After curing, scrape the bottom part of the resin sample with a sharp lab knife or other instrument, removing the soft resin.
• Keep scraping until the process becomes very difficult and you appear to be cutting the resin instead of removing soft, partially cured resin.
• Measure the depth of the cure. This is not a very accurate test; however, it provides some indication of the acceptability of the light you are using.
• Modify your technique and/or get a new light if the depth of cure is not satisfactory.
Assuming the light(s) you are using cure(s) deeply, how are you or your assistants using the light? Is the curing being accomplished adequately?
• The light should be placed as close to the resin as possible.
• The light should deliver the energy perpendicular to the resin surface. This concept is not done properly in many offices. Variation from this suggestion reduces the adequacy of light cure.
• It is suggested when doing bulk filling that lights preferably with a tip diameter of 10 mm be used. That is not the case in most practices, since many lights have tip diameters of only 7 mm.
• The light tip should be clean of any debris, which lessens the adequacy of cure.
• What is the significance of inadequate curing? The resin is not converted (cured) to an optimum level, leakage of the restoration is present, and caries is the eventual result, especially at the apical areas of tooth preparation.
In my opinion, inadequate lights and poor light curing are two of the most important reasons why bulk filling may fail with resultant caries.
Interproximal contact areas
Most of the newer matrix forms and wedges for Class II restorations (such as Danville, Dentsply, Garrison, Triodent, Ultradent, and others) separate the teeth and, if properly placed, the metal matrix band is then directly in contact with the adjacent tooth. Such sectional matrices usually ensure adequate contact areas. Some bulk-filling materials do not have significant viscosity, and thus, if the matrix band is not pushed tightly against the adjacent tooth by the viscosity of the resin, the result is an open contact area.
If the matrix band is not in tight contact with the adjacent tooth, making a tight proximal contact can be difficult, and incremental placement and curing of a small amount of resin at a time-while holding the matrix against the adjacent tooth-usually produces a better result.
Establishing proper tooth anatomy
Placing resin in large increments often does not facilitate easy one-time contouring of large restorations. That is primarily because when placed into the mouth, the resin warms up from body heat and slumps into an undesirable shape. Smaller incremental placement allows the clinician to build the contour of the resin a small amount at a time, curing and moving to the next increment. When placing a large amount of resin into a tooth preparation, the resin must be placed rapidly to avoid the heating and slumping that unavoidably occurs after a few minutes in the mouth environment.
Overfilling
There is a tendency to overfill tooth preparations when bulk filling. Some dentists place large pieces of resin, which cover much of the occlusal surface. Such placement requires significant time and effort to finish and polish the restoration.
Whether you are placing resin incrementally or in bulk, when approaching the occlusal cavosurface margins, do not overfill more than a few tenths of a millimeter. This will make finishing easier.
Overfinishing the bulk-fill resin
If the tooth preparation has been overfilled, it is difficult to locate the tooth preparation margins when finishing. Time is required to do so, and sometimes it is difficult to find satisfactory instruments that will finish the overhanging material. As a result, some dentists inadvertently leave significant overhanging pieces of resin when they place bulk-fill restorations. These overhangs can create difficult oral hygiene challenges and stimulation of caries.
To reduce the challenge of overfilling, extra care should be taken to place adequate matrices when bulk filling. Incremental filling can offer more control when putting the resin into the preparations since the increments are smaller and easier to manipulate.
Developing "white lines" when finishing
What are white lines? Every restorative dentist has developed white lines around margins when finishing. The finishing process starts with good intentions, but the white lines occur. As the tooth preparation margin is approached, often the homogeneous and equal color of the tooth and the restorative material changes, and a white line between the tooth and the restorative material appears. Clinicians Report has analyzed this situation using scanning electron microscopy. The white line is a breakdown of both the tooth structure and the restorative material, caused by unintentional abuse of the marginal area. If the tooth preparation has been overfilled, it is very easy to abuse the margin when attempting to remove the overfilled restorative material.
Incremental filling can reduce the chance of developing white lines, since the small amount of resin placed usually allows more control and less chance of overfilling.
Reducing the frequency of developing white lines when finishing
The following procedure is one of numerous techniques used to reduce the white-line phenomenon. Undoubtedly, other techniques would also accomplish this desired goal.
1. Select the bur contour of your choice. I prefer 12-bladed carbide burs for finishing (figures 2a and 2b).
2. Use No. 7406 for occlusal margins. This is a football-shaped bur. The sharper the bur, the fewer white lines produced. I prefer a new bur for Class I and Class II restorations. After the first use of the bur, it can be sterilized and used for less critical procedures, such as occlusal equilibration or other uses.
3. Use No. 7901 for overhangs on the facial and lingual aspects of the most apical margins. This is a small tapered bur with a point. Since primarily cutting resin, it does not have to be a new bur and is seldom needed if the matrix has been placed adequately.
Figures 2a and 2b: Small Class II resin-based composite restorations can often be filled in bulk successfully if the matrix is placed adequately, the light used is powerful enough, and the light is aimed correctly and as close to the resin as possible.
4. Use No. 7801 for placement of grooves and sluiceways in the occlusal surfaces. Again, a new bur is not necessary.
5. When finishing, use light touch, low speed (preferably electric engine at 1,000 to 2,000 RPM), with no water spray, which totally obscures the margins. Wear loupes.
6. Gently shave away the excess resin. As soon as the margin is observed, stop.
7. For areas accessible to discs, use very light touch with your normal discs in the same manner as above for margins that do not allow disc access due to occlusal anatomy.
8. Use your preferred finishing and polishing wheels (examples are Greenie and Brownie points from Shofu Dental Corporation, or Politip finishing and polishing instruments from Ivoclar Vivadent), followed by a composite polishing paste on a soft rubber cup (examples are Prisma-Gloss from Dentsply Caulk, or Enamelize from Cosmedent Inc.).
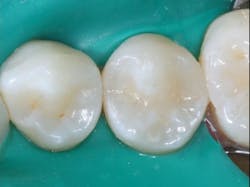
White lines will be minimal or nonexistent when you use the technique described above (figure 3).
Figure 3: The technique described in this article explains how to place resin restorations without producing the well-known "white line" around the margins, as shown in this image.
Summary
There are numerous ways to restore tooth preparations successfully with composite resin. Most importantly, find or develop a technique that best meets the needs of your patients. Bulk filling has been successful for many practitioners, but it has also led to some significant challenges for others. Hopefully you've learned from this article how to make bulk filling more successful and how to avoid the challenges.
MORE FROM DR. GORDON CHRISTENSEN |Pulp cap or endo?
Reference
1. Should your next curing light be an online bargain? Clinicians Report. http://www.cliniciansreport.org/uploads/files/403/MktgRT0314.pdf. Published October 2014. Accessed December 20, 2016.
Gordon J. Christensen, DDS, MSD, PhD, is a practicing prosthodontist in Provo, Utah. He is the founder and CEO of Practical Clinical Courses, an international continuing-education organization initiated in 1981 for dental professionals. Dr. Christensen is cofounder (with his wife, Dr. Rella Christensen) and CEO of Clinicians Report (formerly Clinical Research Associates).


